Please Rate Us on this post


Charging IC BQ25601
Charging IC BQ25601
🔋 Redmi 5A Charging Solution – Full Guide
- Redmi 5A Charging Solution – Full Guide Step By Steps
1. Battery & Connector Check
-
Minimum Battery Voltage must be 3.6V.
-
If battery is below 3.6V → pre-charge using a regulated power supply.
-
If still not detected: check BSI line (Battery Sense) & TH line (Temperature).
-
Clean/replace battery connector if loose or oxidized.
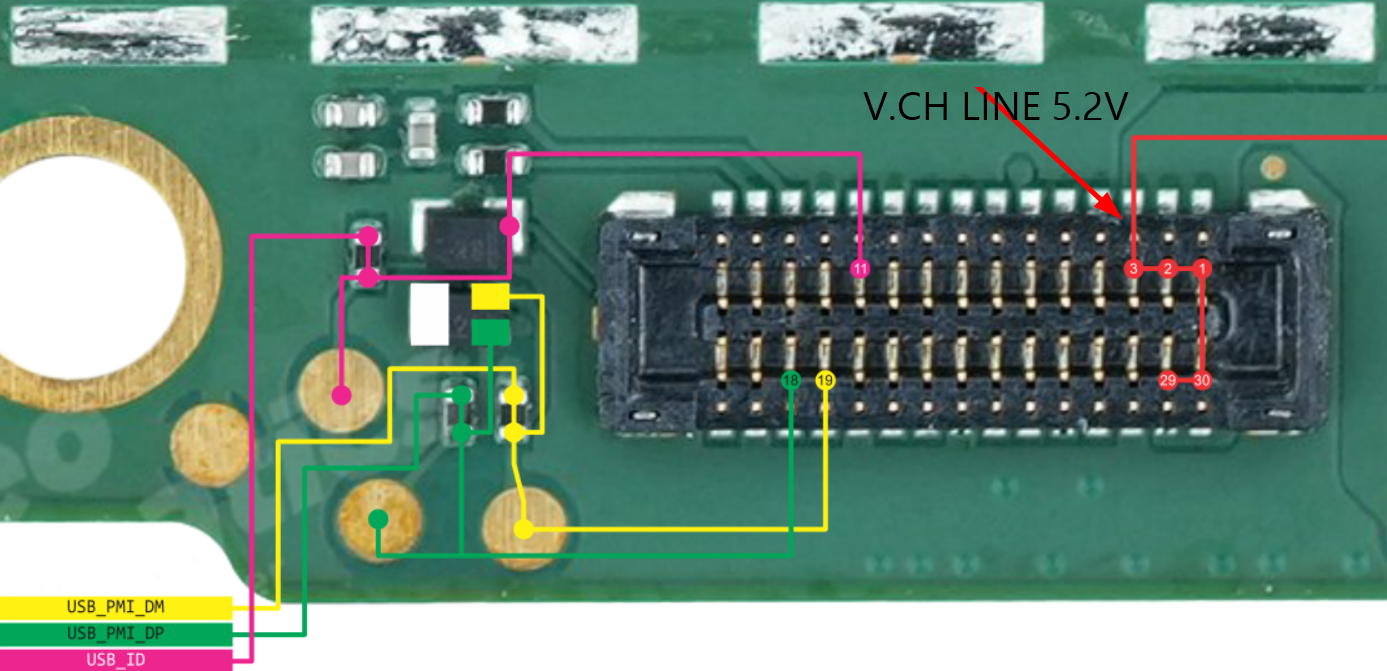
2. Charging Connector & Sub PCB to Mainboard Lines
-
Inspect USB connector for physical damage.
-
Verify continuity from Sub PCB to Mainboard:
-
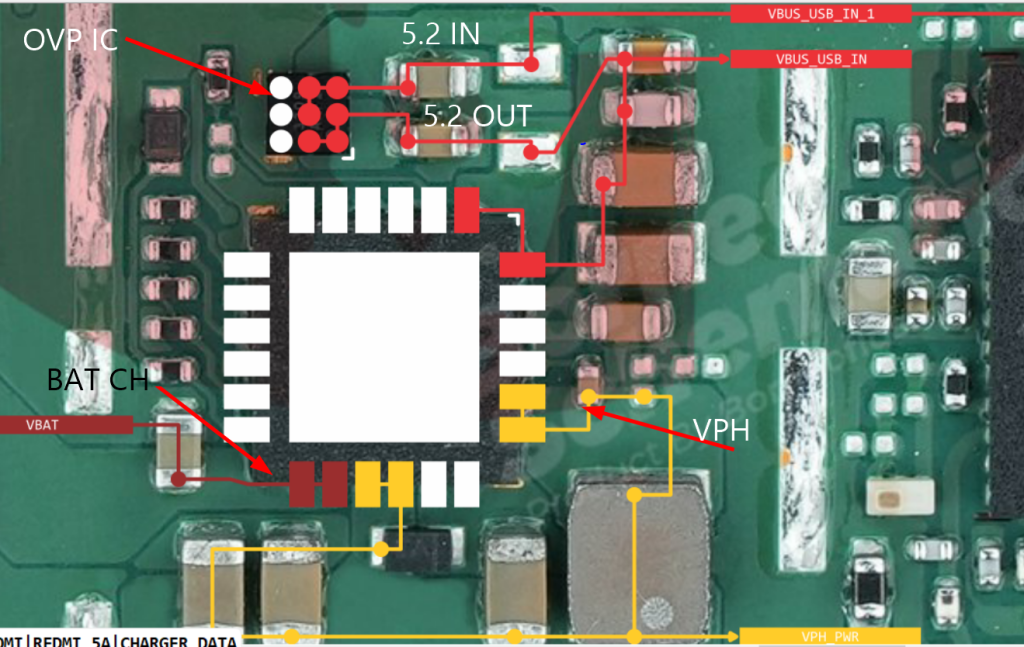
Vbus (+5V) → must reach OVP IC input.
-
GND (Ground) → proper ground return.
-
DP, DM (USB Data Lines) → must connect correctly to Charging IC for handshake.
-
VBAT line → direct connection to Battery Connector.
-
3. OVP IC (Over Voltage Protection IC)
-
Protects the phone from >5.5V input.
-
Check:
-
Input Pin → 5V from charger.
-
Output Pin → regulated 5V to Charging IC (BQ).
-
-
If input is present but no output → replace OVP IC.
4. BQ Charging IC (PMIC Charging Controller)
The BQ IC (Texas Instruments family, commonly used in Redmi 5A) is the main charging controller.
🔄 Charging Sequence of LDOs (BQ IC Working Steps):
-
Adapter Detection
-
Vbus (5V) detected → BQ IC activates.
-
DP/DM handshake with charger decides charging current (Normal USB: 500mA, Fast Charger: up to 2A).
-
-
LDO Power-up
-
BQ IC generates internal LDO voltages (1.8V, 3.3V) to activate charging logic.
-
-
Battery Pre-Charge
-
If VBAT < 3.6V → BQ IC sends a small pre-charge current (~100–200mA).
-
-
Fast Charge Mode
-
Once VBAT > 3.6V → full charging current (up to 1.5A).
-
DP/DM confirm charger capability.
-
-
Constant Voltage Phase
-
At VBAT ~4.2V, current reduces gradually to protect the battery.
-
-
Charge Complete
-
Charging stops when current drops below threshold.
-
5. Role of DP & DM Lines
-
DP/DM lines are not just for data – they are used for charger handshake (DCP/CDP/Apple/Samsung protocol).
-
If DP/DM are open/short:
-
Phone may show “Charging” icon but no current flows (Fake Charging).
-
Only 0.1A–0.2A drawn on power supply.
-
6. Common Problems & Fixes
⚡ Fake Charging Issue
-
Symptom: Phone shows charging symbol, but battery percentage doesn’t increase.
-
Causes:
-
DP/DM line open.
-
OVP IC output faulty.
-
BQ IC malfunction.
-
-
Fix: Check DP/DM continuity → Replace OVP → Reball/Replace BQ IC.
🌡 Temperature Issues
-
Symptom: Phone stops charging / error “Battery temperature too high/low”.
-
Causes:
-
TH line open or short.
-
Faulty thermistor inside battery.
-
Damaged PMIC sensor circuit.
-
-
Fix: Replace battery → Check TH line to mainboard → Replace PMIC if needed.
🔄 Restart / Auto Reboot Issue While Charging
-
Symptom: Phone restarts randomly during charging.
-
Causes:
-
Weak battery (high internal resistance).
-
Bad BSI line connection.
-
Overheating of Charging IC (BQ).
-
-
Fix: Replace battery → Reball BQ IC → Reflow PMIC.
7. Quick Current Reading Reference (On DC Power Supply)
-
Connect phone without battery → should boot with ~0.05A idle draw.
-
Connect with battery and charger:
-
Pre-charge: 0.15A–0.3A
-
Normal charge: 0.8A–1.5A
-
Fake charging: <0.1A (symbol shows but no charge).
-
🔧 Final Technician Notes
-
Always test with original cable & charger.
-
If water damage suspected, clean charging section before repair.
-
If all above checks are fine → last suspect is PMIC main power IC.
Youtube : Channel
Thanks From All GSM FILE
Complete Bengali Mobile Repairing Course In Kolkata: Apply now